
How to Use an Equivalent Exposure Calculator to Achieve Perfect Exposure in Your Photos
Have you ever been out on a sunny day, trying to capture the perfect shot, only to find that your photos are too dark or too bright? Frustrating, right? Equivalent exposure refers to different combinations of aperture, shutter speed, and ISO settings that result in the same overall exposure for an image. In other words, adjusting one of these settings can be compensated for by adjusting one or both of the other settings to maintain the same exposure level. This understanding is essential for adapting to different lighting situations and achieving the desired creative effect in your photos. Well, fear not! We’re going to dive into the world of equivalent exposure and how you can use an equivalent exposure calculator to achieve perfect exposure in your photos.
Understanding Exposure
Before we jump into the nitty-gritty of equivalent exposure, let’s start with the basics of exposure in photography. Exposure refers to the amount of light that reaches your camera’s sensor or film. It’s a fundamental concept that every photographer should master.
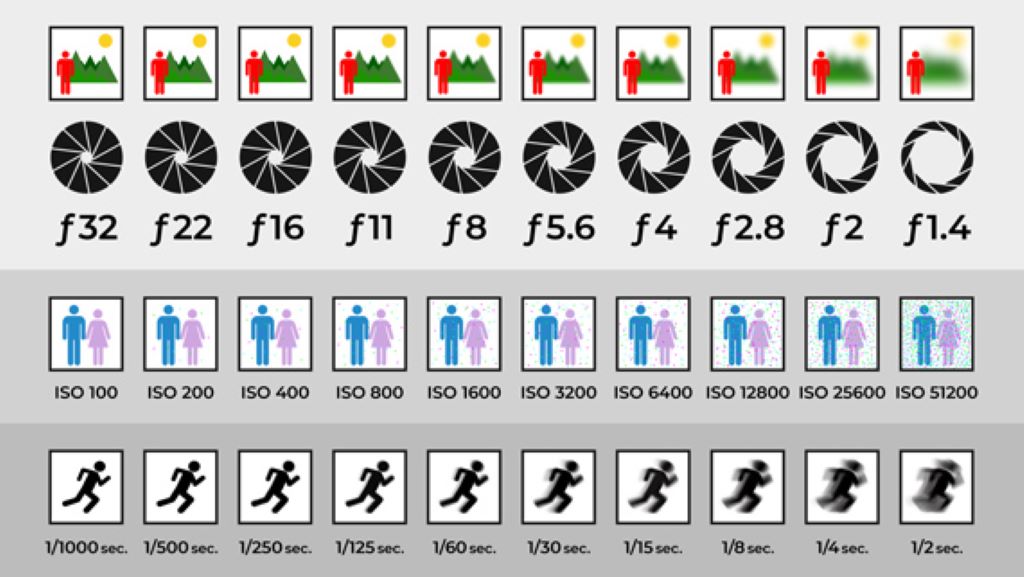
Exposure is determined by three main factors:
- Shutter Speed: This controls the amount of time your camera’s sensor or film is exposed to light. A fast shutter speed (e.g., 1/1000s) lets in less light and freezes fast-moving subjects, while a slow shutter speed (e.g., 1/30s) allows more light and captures motion.
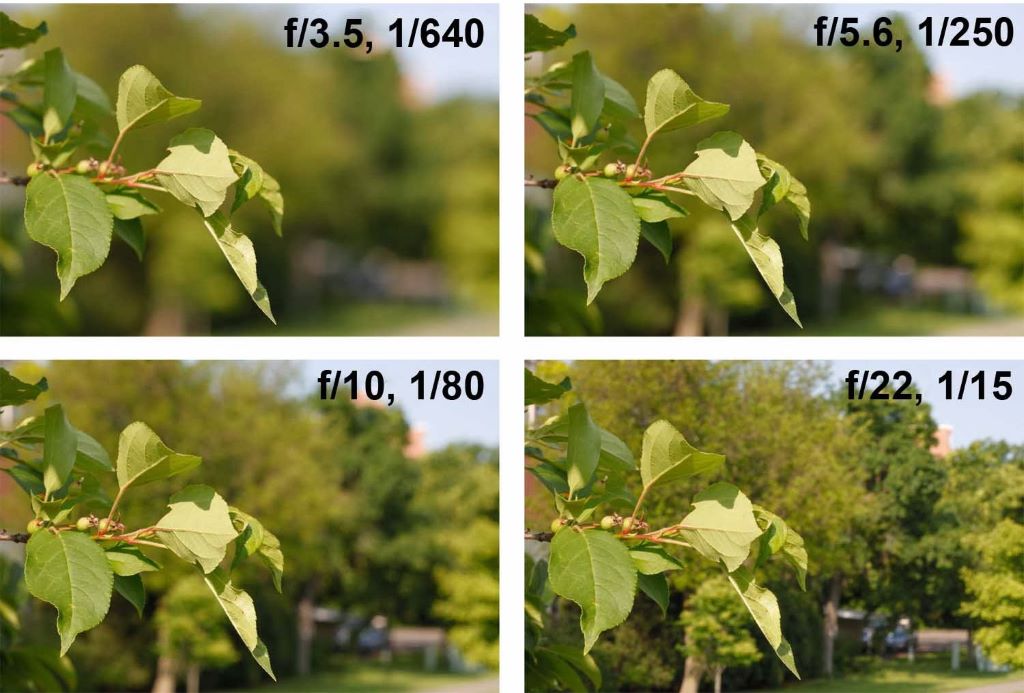
- Aperture: The aperture is the size of the opening in your camera’s lens. It affects the amount of light that enters the camera. A wide aperture (e.g., f/1.4) lets in more light and creates a shallow depth of field, while a narrow aperture (e.g., f/16) allows less light and produces a deep depth of field.
- ISO: ISO measures the sensitivity of your camera’s sensor or film to light. A low ISO (e.g., ISO 100) is less sensitive and is suitable for bright conditions, while a high ISO (e.g., ISO 3200) is more sensitive and is used in low-light situations.
Perfect exposure is a delicate balance between these three factors. When you get it just right, you achieve a well-lit, properly exposed photograph. But what if the lighting conditions are tricky, or you want to experiment with creative effects? That’s where equivalent exposure comes in.
What Is Equivalent Exposure?
Equivalent exposure is a concept that helps you achieve the same level of exposure while adjusting one or more of the exposure factors (shutter speed, aperture, or ISO). In other words, it allows you to maintain the same overall brightness in your photo while changing other aspects of the exposure triangle.
Think of it like this: Imagine you have a recipe for a delicious dish, but you want to make it spicier. You can add more spices while keeping the other ingredients the same. Equivalent exposure is similar; you tweak one setting while compensating with another to maintain the desired level of brightness in your photo.
Now, let’s delve into how you can use an equivalent exposure calculator to work this magic and capture stunning shots every time.
Using an Equivalent Exposure Calculator
- Choose Your Base Exposure:
Start by setting your camera to a baseline exposure. This is your starting point, and you can adjust it according to your creative vision. For instance, you might set your aperture to f/8, shutter speed to 1/125s, and ISO to 200 for a typical well-exposed shot. - Select the Variable:
Determine which exposure factor you want to change. Is it the aperture, shutter speed, or ISO? Let’s say you want to experiment with a shallower depth of field, so you decide to widen your aperture. - Use the Calculator:
Here comes the fun part – using an equivalent exposure calculator. You can find these calculators online or use apps designed for photographers. They allow you to input your baseline exposure settings and the adjustment you want to make. In our case, we want to open the aperture wider. The calculator will then tell you how to adjust the other settings to maintain the same exposure.
For instance, if you open the aperture from f/8 to f/4 (which lets in more light), the equivalent exposure calculator might suggest increasing the shutter speed from 1/125s to 1/500s (to reduce the amount of light hitting the sensor) to keep the overall exposure consistent. - Capture Your Shot:
Once you have your new settings, it’s time to take the shot. Your equivalent exposure adjustments ensure that your photo isn’t overexposed or underexposed, even though you’ve changed one aspect of the exposure triangle. - Review and Refine:
After capturing the shot, review it on your camera’s LCD screen. Check for any adjustments needed in terms of composition, exposure, or focus. If necessary, fine-tune your settings and take more shots until you’re satisfied with the result.

Equivalent Exposure Scenarios
Now, let’s explore some common scenarios where equivalent exposure can come in handy:
- Changing Depth of Field:
As mentioned earlier, widening or narrowing your aperture can dramatically impact your depth of field. If you want a blurry background for a portrait, you can use an equivalent exposure calculator to adjust your other settings accordingly.
- Freezing or Blurring Motion:
When photographing fast-moving subjects, like sports or wildlife, you might need to adjust your shutter speed. A higher shutter speed freezes action, while a slower one can capture motion blur. An equivalent exposure calculator helps you make these adjustments without sacrificing exposure.
- Low-Light Conditions:
Shooting in low-light situations often requires increasing your ISO to boost sensitivity. However, this can introduce noise into your photos. To maintain the same exposure while minimizing noise, use an equivalent exposure calculator to decrease your shutter speed or open up the aperture.
- Creative Experiments:
Photography is an art, and sometimes you want to push the boundaries of creativity. Equivalent exposure allows you to do just that. Want to capture a long exposure shot of a flowing river during daylight? You can use an equivalent exposure calculator to balance the extended shutter time with a smaller aperture or lower ISO.
FAQs (Frequently Asked Questions)
- What is the benefit of using an equivalent exposure calculator?
An equivalent exposure calculator helps you maintain consistent exposure levels while making adjustments to your camera settings. This ensures that your photos are properly exposed even when you’re experimenting with creative effects or dealing with challenging lighting conditions. - Do I need a special camera or equipment to use equivalent exposure?
No, equivalent exposure is a technique that can be applied to any camera with manual settings. You don’t need specialized equipment, but having a good understanding of your camera’s controls is essential. - Can I achieve perfect exposure without using equivalent exposure techniques?
While it’s possible to achieve perfect exposure through trial and error, using equivalent exposure simplifies the process and saves time. It allows you to confidently make exposure adjustments without the guesswork. - Are there equivalent exposure apps for smartphones?
Yes, there are equivalent exposure calculator apps available for smartphones. These apps can be handy when you’re shooting with your phone’s manual camera settings and want to maintain consistent exposure. - What’s the difference between equivalent exposure and exposure compensation?
Equivalent exposure involves adjusting one exposure parameter while compensating with others to maintain consistent brightness. Exposure compensation, on the other hand, is a feature in many cameras that allows you to intentionally overexpose or underexpose a photo for creative purposes without manually adjusting all settings.
Conclusion
Photography is a wonderful blend of science and art, and mastering exposure is a crucial step in becoming a skilled photographer. Equivalent exposure gives you the flexibility to experiment with your camera settings while ensuring that your photos are perfectly exposed.
Four nature & wildlife photography competitions you can join for exposure await your lens, so, next time you’re out with your camera and faced with challenging lighting conditions or creative ideas, remember the power of equivalent exposure. It’s like having a secret recipe that allows you to spice up your photos without losing the perfect balance of flavors.
Happy shooting, and may your photos always be perfectly exposed!


